
How To Repair An Air Compressor Tank

Air compressors are useful for a wide range of applications across auto repair shops and garages. Unfortunately, we have probably all been in a situation where our compressor was not working properly. From filling tires to operating air-powered tools, you need a reliable air compressor to get the job done. Here, we will outline a few of the different types and components of air compressors and how to repair an air compressor.

Be Extremely Cautious About Trying to Repair a Tank

It should be noted first and foremost that SVI never condones or encourages home repair of the air tank itself on your compressor. Again, you should NEVER attempt to repair an air compressor tank. Even trained professionals rarely do so.

Why? Because of the large amounts of pressure and forces being created by an air compressor, making an improper repair can result in huge safety concerns. An incorrectly repaired tank can cause your equipment to explode violently and without notice, potentially resulting in severe injury or death. With that in mind, here are three ways to begin making a repair on your air compressor.

3 Methods of Air Compressor Tank Repair

Method #1

If there is a simple issue with a valve or hose, you can easily replace the part. Simply contact our team, tell us which part is broken and what type of compressor you use, and we will be able to find or manufacture a repair part for you.

Method #2

If there is an issue with your air compressor’s tank, any repair efforts will need to be put on hold. Most likely, you will want to replace the entire tank to avoid any future complications. 

Method #3

If your air compressor is relatively old and you think it is time for an upgrade, you can purchase an entirely new air compressor and avoid the need for repairs altogether.

Air Compressor Tank Types

If you decide that replacing your tank is all the repair you will need, there are several different types of air compressor tank types. Each of these tanks are relatively similar in terms of function, but there are some nuanced differences you will want to consider.

The main factors you will want to look out for are the capacity of the tank and your storage requirements. In some cases, the type of tank that suits you best may simply be the tank type with which you are the most familiar.

Pancake Compressors are storage tanks which are flat and round. On pancake compressors, the tank is bolted to the bottom of the machine. The shape of these compressors makes them easier to store and are usually best suited for those who want an air compressor at home.

Hot Dog Compressors include a single cylindrical shaped tank. These compressors are designed horizontally to optimize their ability to be stored.

Twin-Stack Compressors have two cylindrical and horizontal tanks side-by-side. These style of air compressors increase the air capacity of the machine for those who need compressed air regularly.

Wheelbarrow Compressors are all about ease of mobility. They come with handles and wheels for easy movement. While they can differ, most of these types of configurations also have two cylindrical, horizontal tanks.

Features to Seek in Replacement Air Compressor Tanks

Tank Size

The size of the tank you choose will have direct, nominal influences on your ability to work efficiently. Larger tanks result in a greater air capacity that can be compressed throughout your workday. However, if you do not have long working hours, or can complete your work in sections, waiting for the air pressure to build again, smaller tanks may be an equally useful option for you.

Air Pressure Rating

Air pressure rating is a major area of consideration when selecting the correct air compressor tank. Most tanks require a rating of 90 PSA (pounds per square inch) to operate effectively. To achieve this, you may need to adjust your air compressor’s shut off procedure.

Most industrial air compressors have tanks with a two-stage shut off. Commercial or home compressors usually only have one stage. When determining which is best for you, compare your current tank’s pressure rating to the new one. Your main objective will be making sure it is compatible with your existing compressor.

Horsepower

One of the best ways to ensure your new air compressor tank meets your needs is to view the horsepower available. There are many overrated horsepower air compressors, so be sure to take this into account during your search for a replacement. Motors with different horsepower will take different amperage and voltage requirements. Additionally, selecting either a gas or electric motor will also impact the rating, yet gas motors tend to be more popular. However, with advancing technology, electric motors may become more common.

Air Compressor Longevity

Duty Cycle

There are many issues impacting the life expectancy of your air compressor and the tank attached. One is referenced as the duty cycle. The duty cycle expresses how long you can keep your air tank running as a percentage. Many home compressor tanks have a duty cycle of around 50%. That means you should not run the compressor for more than 5 minutes at a time. If you go over that time allotment, it will not fry your engine immediately, but it will lower the life expectancy of your machine. Over time, running your compressor for longer than the duty cycle allows may also cause severe damage to your tank.

Moisture

Another issue to address that affects the lifespan of your air compressor is moisture. Moisture can accumulate in a tank as it begins to cool off. Longer use periods will result in more moisture; therefore, the best option is to choose a larger sized tank. This will allow you to use your air compressor for longer durations without moisture becoming an issue.

Alternatively, many experts in high humidity areas will use a moisture trap to collect water. These traps do not impact the air compressor’s performance.

Cost

The final factor which will impact the longevity of your air compressor is the cost. There are many deals out there but remember: you get what you pay for.

This is not to say that you will have to break the bank just to get a decent air compressor tank but be sure to be on the lookout for “deals” that are too good to be true. You may end up paying for that more expensive tank you decided against not long after purchasing a cheap alternative.

Get the Best Auto Parts for Your Needs – Partner with SVI

SVI International is the industry leader in repair parts for automotive lifts and industrial equipment. When you work with our team, we will be sure to provide you with the best solution for your needs, at an affordable cost.

Contact our team today to get started.
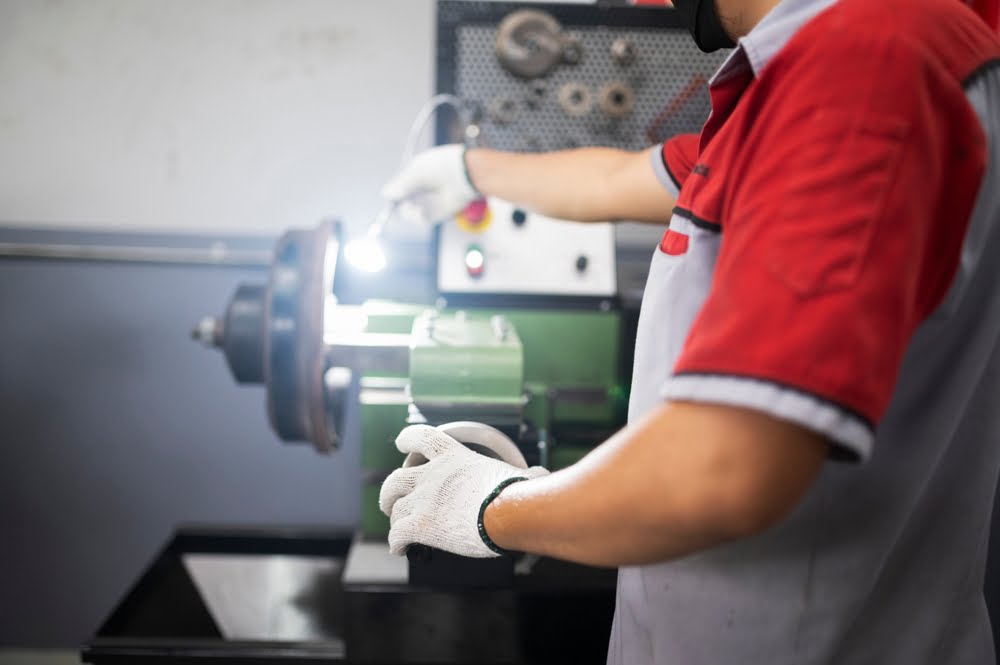
How to Use a Brake Lathe: A Complete Guide

Man using a brake lathe

If your shop performs routine brake work, you already know how essential a brake lathe is to your work. But sometimes, setting up your lathe can be confusing, so this complete guide should clarify any misunderstandings. 

What is a Brake Lathe

A brake lathe is used to correct the thickness of a rotor after issues with vibration or noise problems after a period of heavy brake use. After continuous uneven contact with the brake pad on the rotor, the brake pad can damage the rotor.

There are two types of brake lathes- on-car and off-car lathes.

On-car Lathes

On-car brake lathes are usually more dependable than off-car lathes because they provide a better finish and more accuracy. They also help eliminate wasted hours and extra work.

 On-car brake lathes are installed in the same place as the brake caliper, making it easier and more efficient. In addition, an on-car lathe is an excellent tool for turning troublesome rotors on vehicles with captured rotors and those sensitive to rotor runout.

Off-car Lathes

Off-car lathes are also referred to as bench lathes. A bench lathe is a necessary tool if you have to resurface drums or rotors.

A brake lathe mounted on a workbench is called a bench lathe. It’s also referred to as an off-car lathe because the mechanic removes the rotor from the car and then mounts it to the lathe.

This lathe relies more on its alignment, easily thrown out of spec from damage or frequent use. At best, a misaligned lathe will provide acceptable resurfacing; at worst, it might score or damage the rotor beyond the point of resurfacing.

How to Use a Brake Lathe

The focus of this section is on using an on-car brake lathe.

Step 1: Find and Mount an Appropriate Adapter

Once you’ve found the appropriate adapter, you need to mount the lathe’s hub adapter using the proper torque specifications. All nuts should be used around the adapter and tightened evenly by hand. 

Step 2: Tighten Drive Shaft

Once the machine is pushed up to the adapter with the alignment pin adequately engaged, there is a hand-operated screw in the center of the drive shaft to tighten. This is a hand knob, which means it only needs to be hand tightened.

Step 3: Adjust the Lathe

Many machines will automatically adjust once you plug them in. Just press reset and then the start button. The display will show the runout of the mounted rotor or drum and then adjust down. Some on-car lathe models have a plate between the lathe and adapter that you must adjust. After runout adjustment is performed, it is time to cut. 

Step 4: Cut the Bearing or Drum

Cut the rotor appropriately to size and specifications.

Step 5: Note Differences With Vehicles

Front and rear rotors are cut similarly with on-car lathes, but cutting rear rotors on limited slip differentials is slightly different. Therefore, you must first put the vehicle in neutral before machining. Also, some all-wheel-drive cars may need the rear drive shaft lowered on one end.

Step 6: Clean Sensors and Tone Rings

After cutting, you should clean the tone rings and wheel speed sensors. Cleaning the sensors and tone rings is essential because metal dust will cover the sensors.

Step 7: Inspect the Bearings

While it’s not required, inspecting the bearings while machining a car’s rotors is good. Some mechanics may do this with their brake service, and others do it as a separate service. While it is possible to machine hub-type rotors without touching the bearings, it’s not ideal. A brake service is usually the only time bearings will be inspected. 

Step 8: Maintain the Lathe

Properly maintaining your lathe is imperative. Keep your cutting bits sharp, in proper repair, and the machine clean, and it will provide your shop with many years of use. 

Brake Lathe Setup 

When working with a lathe, wear proper eyewear, tie loose hair back, and avoid loose clothing. Before using your lathe, it’s imperative to set it up correctly for safe use.

Step 1: Inspect the lathe.

All the surfaces of your adapter, arbor, and bell clamps should be clean and free of grease, debris, or chips. Also, check for any damage.

Step 2: Clean the drum or rotor.

In addition to cleaning the surfaces of your adapter, arbor, and bell clamps, you also need to clean the rotor and drum. They should be free of rust, scale, or other debris. 

Step 3: Choose the correct adapter.

When choosing an adapter, always use the largest adapter possible. In addition, do not use centering cones as spaces.

Step 4: Use an anti-chatter device.

To dampen vibration, use a silencer band or anti-chatter device

Safety / Benefits of Using a Brake Lathe

The advantages of using an on-car brake lathe include reduced pedal pulsation, reduced rotor runout, and uneven wear. It can also save your technicians time, allowing them to work on several rotors simultaneously.

However, having an on-car lathe is often impossible for mechanics with limited space. Therefore, many small shops use bench brake lathes as a solid second choice.

Off-car lathes can be used for different machining jobs. They are portable and easy to clean, giving them an advantage over on-car lathes. In addition, the bench lathe’s cutting head can be positioned precisely at the desired depth for an exact cut. This feature can make resurfacing a rotor faster and easier, depending on the size of the disc.

SVI has an extensive inventory of on-car and bench lathes. In addition, if your shop needs any lathe parts like adapters, centering cones, or spacers, we have a large selection. Whether you’re looking for lathe parts or a new complete lathe, we have experts ready to help you. So if you’re unsure what you need, let us help you. Our friendly customer service team is prepared to help you get your shop set up for success.

How To Use An ATV Lift

The prospect of sliding through a muddy trail is one of the greatest outdoor adventures, inspiring hundreds of thousands of United States citizens to purchase ATVs. However, like any automobile, maintenance is part of the investment and most repairs require the ability to lift the body of the vehicle off the ground.

How do you jack an ATV for repair? In the content below, we explore a few of the most common ways to lift an ATV off the ground to perform maintenance.

Safety Is a Worthwhile Investment

Before diving into lift options, we most note that safety is of upmost importance. While some online resources suggest DIY methods of jacking an ATV, these are unsafe and should be avoided. It is best to purchase a system intended for lifting.

Though lifting the ATV off the ground for maintenance involves some risk, following proper procedures minimizes the risk of injury. Safety is a worthwhile investment!

Top 4 Jacks For Lifting an ATV

1. Hydraulic Floor Jack

Hydraulic floor jacks can be used to lift a variety of personal vehicles, including lawn mowers or small cars. Because these jacks serve a multiple of functions and are one of the safest jacks to use, they are a worthwhile investment. They are fast and simple to use. The downside of hydraulic floor jacks is that they are heavy, making them difficult to move. However, if you plan to primarily work in one location, such as the garage, the hydraulic floor jack is an excellent option.

2. ATV/ Motorcycle Jack

ATV and motorcycle jacks are specifically designed to lift these small vehicles. Some ATV jacks have wheels for easy transportation. Additionally, these lifts are built to hoist ATVs and motorcycles with purposefully-designed balance.

Why not just purchase a lift designed for your ATV? Well, ATV lifts are not flawless. Consider a few downsides. First, these lifts hoist the vehicle from the center, so that area is not accessible for maintenance. Secondly, the price is not always worth it, because ATV or motorcycle lifts have limited functionality.

3. Scissor Jack

Unlike hydraulic floor jacks, scissor jacks are small and portable. If your ATV needs a quick repair in the middle of the outdoor track, you can simply carry the jack to your vehicle and perform the repair. Though scissor jacks are portable and lightweight, they are not as efficient as the aforementioned options. These jacks must be manually lifted by turning a handle, requiring a bit more effort and time.

4. Table Jacks

Table jacks look like miniature tables and often have wheels. Though table jacks are found in automotive shops more often than a garage, they are an excellent option to achieve undercarriage ATV access. However, table jacks capable of hoisting heavier ATVs and small vehicles can become expensive.

SESM Lifts

Small Equipment Shop Maintenance lifts are powerful outdoor power equipment lifts, designed for golf carts, UTVs, ATVs, lawn mowers, motorcycles, and any other small vehicle that requires quick, effective maintenance.

SESM lifts are often found in shops and dealerships; however, they are also an excellent option for residential automotive shops and garages. SESM lifts are installed directly into the ground and can lift a wide variety of small equipment. Though SESM lifts are not the most inexpensive option, they are trustworthy and designed to last.

I Bought My Jack. How Do I Lift The ATV?

Once you have selected and purchased the best ATV jack for your location and vehicle, place it on flat, sturdy ground. If the lift is a permanent solution, pick a place in your garage or driveway where it will accessible but out of the way.

After your jack or lift has been installed in the best location, you can hoist your ATV utilizing specific ATV lift points. Proper lift points differ based on model of ATV, so take the time to learn the best points for your vehicle. However, as a rule of thumb, do not lift the ATV from the A-Arms, bottom of the engine, rotors, or rear sprocket.

SVI International: Leader in High-Quality Automotive Equipment

SVI International is the leader in repair parts for automotive lifts and industrial equipment. With 3 ready-ship warehouses located across the United States, we provide on-time, same-day shipping on in-stock parts.

Unsure which ATV lift option is best for your situation? We’re always here to answer your questions. Give us a call at (800) 321-8173 or complete our online contact form. We’ll be in touch promptly!

Hydraulic Car Lifts – How Single and Double Hydraulic Pumps Differ

Whether you are buying a car lift as a car enthusiast looking to work on vehicles as a hobby, or an automotive shop looking for a new lift—buying a car lift is a big decision. There are multiple factors you should weigh when planning on which type of lift to purchase. What kind of vehicles am I hoping to work on? What size lift will I need? What type of lift should I buy? This last question is important in understanding what kind of car lifts are available and what makes them different. For example, some car lifts you see will use chains to pull automobiles upward. However, another way to lift a car is with hydraulic power. This article will help you understand how hydraulic lifts work and the difference between a single-acting and double-acting hydraulic cylinder. This will allow you to have the information to make the best available purchase. 

How Do Hydraulic Lifts Work?

First, it’s important to understand what hydraulic power is and how it works in place of the chain system of other lifts. Car lifts that use hydraulic power will move cars upward when a pump in their structure pushes a liquid from a fluid container to a hollow cylinder. The cylinder then fills with the liquid, forcing the piston component inside to move upward, which creates the movement of the lift. To lower a vehicle, the process is reversed. This is a basic understanding of how car lifts that utilize hydraulic power works. With this understanding, you can now start to look at how this source of power can be more advantageous than a typical chain system for lifting vehicles.

Advantages of Hydraulic Car Lifts

Car lifts that take advantage of hydraulic power and the use of hydraulic cylinders have unique advantages over their chain-powered counterparts. Here are a few reasons why you should consider a hydraulic-powered car lift.

  1. SPACE EFFICIENT- A car lift that uses a hydraulic system takes up less space than its chain counterpart. A chain lift will need room for its beams so the chains can move, so you can operate the lift and move the lift or down. Hydraulic lifts can be more compact because they push from the bottom instead of incorporating the “pulling” motion of the chains.
  2. LESS PARTS- Car lifts that use a chain to lift a vehicle have many moving parts that it utilizes to move a vehicle upward or downward. This exposes more parts and equipment to be strained or to not work correctly, which have you needing to replace parts or your lift. However, a hydraulic lift is simpler in its design and function—making it easier to maintain and less parts to worry about.
  3. SINGLE CYLINDER OR DOUBLE- Lastly, you have the choice with the hydraulic power of a single acting hydraulic cylinder or double acting hydraulic cylinder. Both have different advantages that could work for different types of consumers.

Single vs Double

Power and hydraulic cylinders go hand in hand. Hydraulic power has become a staple of the industrial world—with power and reliability that can be counted on. From the biggest movers to car lifts, they are widely used to get multiple jobs done. However, there’s more to hydraulic power than just the science behind it that was discussed above. There are single-acting hydraulic cylinders and double-acting hydraulic cylinders, and both have their advantages.  By learning the differences between the two, you will have the information necessary to determine which is best for you to purchase.

Advantages of a Single Acting Cylinder

A single-acting hydraulic cylinder is less involved than a double-acting hydraulic cylinder, making it easier to maintain. The cylinder’s action is determined entirely by the pressure on one line. Oftentimes they will have a spring to push or retract the piston rod, or they might rely on the force on end to push it back. The simplicity of the operation makes it more reliable, and fewer parts are being tasked with lifting the vehicle. The simplicity of the single-acting hydraulic cylinder makes it easier to manufacture and repair, leading to cheaper costs associated with the product. Lastly, Due to their single port and small housing, single-acting hydraulic cylinders work well with smaller equipment and spaces. While a single-acting hydraulic cylinder may work for some, others will need the benefits of a double-acting hydraulic system. 

Advantages of a Double Cylinder

A double-acting cylinder alternates cycles of pressurized fluid to both sides of the piston, creating the ability to extend and retract forces to move the piston rod, allowing more control over the movement. Due to this, double-acting hydraulic cylinders allow for additional versatility. While a single cylinder may be best if you’re moving in only one direction, a double cylinder can operate in multiple directions and offer additional control. The two ports make hydraulic power available in both directions and are easily controlled with an effective push-and-pull motion. Therefore, the double-acting hydraulic cylinder is the most used for hydraulic power.

Now that you understand the differences between single-acting and double-acting hydraulic cylinders, you can make an educated purchase on which is best for your needs. 

Find the Right Lift for Your Operation With SVI International

Whether you decide on an automotive scissor lift, a four-post lift, or any other lift model, it’s imperative that you purchase your lift and lift replacement parts from a highly reputable company. At SVI International, we are the industry’s leading supplier of auto lifts and lift repair parts for all types of automotive lifts.

With over 40,000 products, our diverse product line serves as a one-stop shop for equipment parts, lifting equipment, fluid delivery products, RELS brake lathes, and so much more.

We know that downtime can be costly, so our 3 ready-ship warehouses provide on-time delivery and same-day shipping for in-stock parts.

An SVI specialist would love to get in touch about serving your needs, including any questions or concerns you may have. To get in touch, give us a call at (800) 321-8173 or complete our online contact form. We always respond quickly!