How to Use a Hydraulic Car Lift

One of the most crucial purchases you can make for your auto shop or garage is a car lift. Car lifts are used more frequently than any other piece of equipment in your shop, and therefore, you need to ensure that you’ve got a reliable and trustworthy lift.

However, choosing the perfect one might be challenging with so many brands and models on the market.

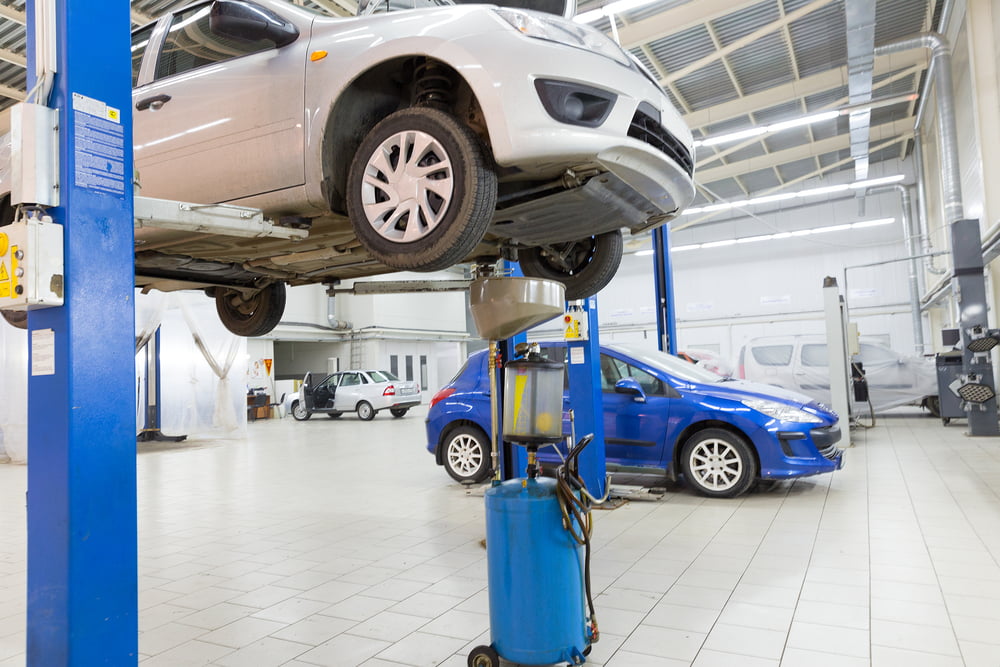
How Does a Car Lift Work?

Various applications employ hydraulic systems, including automotive braking systems, forklift trucks, presses, and pumps. Hydraulic car lifts follow the same basic idea.

The main components of a hydraulic lift are:

  • a cylinder with a piston (called a ram)
  • an oil tank or reservoir
  • a pump
  • a motor to drive the pump
  • a valve

Hydraulic lifts function by pumping oil into the cylinder and pressing the piston (which pushes the lift vehicle) higher. Then, the valve opens to allow oil to flow back into the reservoir and be pushed back by the lift car’s gravitational force as it travels down.

Choosing the Right Lift for the Job

Several types of hydraulic car lifts are on the market, but not all are applicable in every environment. Therefore, it’s essential to consider the following things when shopping for the right lift.

Check for Capacity and Clearance

It’s crucial to check the lift’s capacity, clearance, foundation requirements, and access to manufacturer-recommended lifting points. The lift’s consistency and ease of use are also things to consider.

For example, your capacity needs might let you get away with a scissor lift, but your lift height needs might necessitate a 2-post or 4-post lift.

Two-post car lifts are a style of lift that supports the weight of a vehicle with two metal arms, but you must consider lifting points. So, you must correctly determine the proper lifting points when using a two-post car lift, which can vary with each car. Because of this, two-post lifts necessitate greater caution and precision when in use.

While every automobile lift requires you to be cautious, a four-post car lift lets you drive your vehicle onto the platform without worrying about proper lifting points. There’s no guesswork ensuring your vehicle is aligned correctly when all four wheels support the vehicle’s weight.

Scissor lifts can raise the vehicle to 36 inches off the ground, so a scissor lift might be perfect if you don’t need a high lift clearance. Mid-rise scissor lifts can go up to 48 inches in height, whereas full-rise scissor lifts can go even higher. You might think that all scissor lifts are limited in capacity, yet parallelogram lifts are among the heaviest lifters available.

Verify Safety Standard Certification

The International Building Code mandates that all vehicle lifts fulfill the ANSI/ALI ALCTV safety standard. Therefore, while it is lawful to sell car lifts that do not comply with the ANSI/ALI ALCTV standard, most building codes prohibit the installation of non-compliant lifts.

Do your research and ensure that the manufacturer is not making a false claim about proper certification. You can always double check using the Automotive Lift Institute’s website in their Buyer Beware section.

Also, if you decide to add accessories to improve your lift, confirm that the supplemental items are an approved add-on for your specific lift.

How to Use a Hydraulic Jack to Lift a Car

You’re undoubtedly already familiar with the fundamentals of using a car lift. However, not all lifts are created equal. Training on how to use your lift correctly is essential for safe lifting. Before you use it, make sure you’ve been trained and are familiar with the manufacturer’s instructions, especially if it’s a new or different kind.

Step 1: Pull the Car Forward

Drive the car slowly to the lifting platform and put it in neutral. Ensure all doors are locked and that no one is inside the vehicle. Keep an eye out for antennae and overhead racks obstructing your elevation.

Step 2: Secure the Car

If you have a two-post lift, you must secure the car using the recommended lifting points. First, attach the arms to the car’s base and double check for stability by shaking the vehicle to confirm stability. Then, visually check all the lifting points again. The two-post lift can be challenging to use, and you must make sure the vehicle is adequately balanced.

If you have a four-post lift, you need to set the car on the platform and ensure that the chocks are in place, so the vehicle does not slip.

Step 3: Test the Lift

Start the lift once you are sure that it is sturdy enough to support the car’s weight. Once raised to the required height, confirm that it is placed correctly.

Always double check the chocks or locking mechanism for the vehicle’s stability atop the elevator.

Step 4: Perform Maintenance or Store Your Vehicle

You can now perform any necessary maintenance, or store your vehicle for parking purposes.

It would be best to stay at the controls throughout the lifting and lowering procedure when you’re using a lift. Never disable the controls, features, or safety mechanisms by blocking, overriding, or disabling them. What may save you a few seconds may result in a severe accident.

Step 5: Lower Your Vehicle

First, ensure there is nothing underneath the platform, and then lower the vehicle slowly until it reaches the ground. Then, unlock the locks and chocks, and the car is safe to move.

Automotive lifts are necessary pieces of equipment to have in your bay or garage. They serve a variety of purposes, the most important of which is to provide a safe and convenient area for mechanical tuning of the car.

There are numerous types of lifts on the market and you can choose the one that best suits your needs. Should you need help deciding which lift is best for you, please contact our experts at SVI International. We can help you find the perfect lift for your needs!

How to Use an Air Compressor to Spray Paint

Whether you’re dealing with rust, peeling paint, or blemishes on your car, all you need is a proper workspace and the appropriate tools to paint the vehicle. In addition to needing a paint sprayer, power sander, quality paint, and other painting supplies, you’ll need an air compressor to power the sprayer. So, regardless of whether you’re a body shop mechanic or a car hobbyist looking to do some paint work, you’re going to need to know how to set up an air compressor properly.

How Do Air Compressors Work?

Air compressors are a reasonably simple machine for the versatility that they provide. They work by pushing air into a container and then pressurizing it. Then the pressurized air goes through an opening where it builds up. That built-up air is used to power a variety of tools, including sanders and paint sprayers.

Air compressors have an engine that changes electrical energy into kinetic energy, similar to a combustion engine. They use the same parts, including a crankshaft, piston, valve, head, and connecting rod.

They can deliver pressurized air in a strong enough flow that the automotive paint turns into a fine particulate, ideal for an even coat.

Can You Use an Air Compressor for Painting Cars?

Using an air compressor for painting cars is not just feasible but highly recommended. This tool is ideal if you’re after a smooth finish. Nonetheless, you have to choose an air compressor with care to ensure you’re using the right one for the paint job at hand.

How to Set Up an Air Compressor to Spray Paint a Car

Step 1:

Before starting anything, apply proper safety gear. 

Step 2:

Connect your air compressor hose to the paint spray gun.

Step 3:

Double-check that the air compressor is delivering satisfactory CFM. 

Step 4:

Mix your paint using the recommended proportions. 

Step 5:

Test the pressure of your paint sprayer on a piece of cardboard to ensure it delivers a consistent flow of paint. If you are using an HVLP spray gun, you can use the knob on the side to adjust the spray pattern.

Step 6:

Carefully apply the first coat of paint to the vehicle’s surface. 

Step 7:

Wait 12-24 hours to apply a second coat (if required).

Which Air Compressor to Get for Spray Painting Cars

Air compressors come in many sizes and models. Getting to know your options will help you pick the best tool or tools for your shop.

Types of Air Compressors

Single vs. Two-Stage

Single-stage air compressors are best used for low-demand applications. While you can use one for painting a car, it’s not ideal. Your best option is to buy a two-stage air compressor with 90 PSI that can spray at least 20 cubic feet per minute (CFM).

Reciprocating Air vs. Rotary Screw vs. Centrifugal Compressors

Reciprocating air compressors have a long life span and deliver plenty of air per horsepower. The downside is that they need regular maintenance, including oil filter changes, oil/air separator changes, and valve and piston maintenance. Rotary screw air compressors, on the other hand, only need minimal maintenance. However, they aren’t as efficient as reciprocating air compressors.

Centrifugal compressors are a powerful and efficient option to consider. Like rotary compressors, they don’t need extensive care and maintenance. However, bear in mind that choke and surge can occur at both ends of the performance curve.

Considerations for an Air Compressor

While there are differences between the three types of compressors, it’s most important to focus on how a compressor tolerates air displacement.

If you’re looking to use an air compressor for painting a vehicle, you’ll want to consider a few things.

For example, if you are doing touch-up work, your compressor needs will be different than if you are repainting the entire vehicle. In addition, what is your space availability? What other tools will you be using your compressor for?

The following considerations will help you determine what air compressor is best for you when learning how to use an air compressor to spray paint.

Tank size

The size of your air compressor’s tank is probably the most critical factor in deciding which compressor is best. The proper size tank will make your job extremely efficient. 

If you want to paint an entire vehicle without refilling, a tank size of 50-60 gallons is recommended.

If you choose a smaller tank, you will need to refill it, sometimes more than once, if you are painting the entire vehicle. Smaller tanks also have more variability in the paint flow, so they can cause uneven coats. Lastly, you may have problems with the condensation of the paint with a smaller air compressor. This condensation happens because a smaller tank gets warm inside from constantly running and forms moisture as a result. 

However, if you are concerned about space in your garage, you may want to consider a turbine-style spray paint gun. While not as effective as a 50-60 gallon compressor, the turbine-style paint gun is small and has built-in compressors.

CFM (Cubic feet per minute) rating

CFM is the amount of air per minute that the compressor pushes out, so a higher CFM makes spray painting more efficient. A higher CFM will also ensure that the paint is evenly applied and the final coat is uniform.

Your air compressor needs to have a higher CFM than your paint sprayer, so typically you’ll want a value between 14-18 CFM.

Air pressure

Air pressure (psi) is how much pressure is applied to the air coming out of the compressor. However, PSI is less important than CFM in painting cars.

The CFM is more vital because it delivers the proper paint atomization, while the pressure of the paint is not as crucial.

Many people use a stronger PSI when applying the clear coat, such as 20-25 PSI. However, the base coat PSI should be around 10-15.

Many people find that a high-volume (high CFM), low-pressure (low PSI) compressor, also called HVLP, is a good air compressor choice when you need to complete a paint job. HVLP compressors that deliver close to 20 CFM are best.

Horsepower

While not as crucial as tank size, CFM, or PSI, horsepower should still play a part in your decision. The higher the horsepower is, the more tools it can power simultaneously. 

While most air compressors have a range between 1.5-6.5HP, some large standalone compressors go up to 15HP. 

For optimal performance, a 3-6HP compressor is best.

Additional Air Compressor Parts To Consider for Optimal Spray Painting

Even a good air compressor may not come with the right parts for a spray-painting job. Before you start, it’s wise to stock up on needed parts ahead of time to avoid job delays.

A 50- to 60-liter tank is ideal if you want to paint an entire vehicle without pausing to refill the tank. You may need more than one type of compressor to handle different types of paints, as acrylics and lacquers have different atomization requirements. What’s more, you’ll want to keep air compressor parts on hand as filters and other parts must be replaced regularly. A high pressure air line is also a must.

SVI: The Leading Air Compressor Parts Provider

SVI offers a huge selection of air compressor parts along with all the other equipment and spare parts you’ll need to keep your auto shop running smoothly long-term. We have two ready-ship warehouses to ensure you get your orders without undue delay and our team offers unbeatable customer service to help you find the right tools and parts for your shop. Get in touch with us to find out more or to place an order for the items of your choice.

The recommended tank size for painting an entire vehicle is 50-60 gallons. In addition, look for an air compressor with close to 20 CFM and a PSI that ranges from 10-25. Finally, while horsepower is the least important of the factors, you’ll want an air compressor with a range of 3-6HP.

If you have any questions about your current air compressor and any repair parts, please don’t hesitate to contact us. As the leading supplier of industrial parts, including air compressors, we can get you back to business in no time. We offer parts ranging from air compressor controls, hose reels, pressure gauges, and replacement tanks. We look forward to helping you get back on your feet as soon as possible!

Hydraulic Equipment Care for Car and Truck Lifts  

Hydraulic Equipment

Hydraulic lifts and equipment are essential for any mechanic’s shop, but if you don’t keep up with the recommended maintenance, you may deal with leaks and other issues that cause downtime. Thankfully, maintaining your hydraulic equipment is easy and can keep your shop up and running with little to no customer delays.

Importance of Hydraulic Equipment Care

The importance of having a preventative maintenance program for your hydraulic equipment cannot be overstated. Waiting until you have a leak or necessary repair will cost you money and valuable time. In comparison, preventative maintenance of your hydraulic lift will prevent customer delays and keep your shop running efficiently.

Each manufacturer has specific maintenance requirements for their equipment. Keep these documents handy, and make hydraulic maintenance and care a part of your routine schedule.

A solid preventative maintenance schedule for your hydraulic car lift includes:

  • Keeping the system and drain lines clean of debris.
  • Checking the oil cooler and reservoir.
  • Examining cylinders and seals.
  • Inspecting hydraulic hoses, tubing, and fittings for frays or leaks.
  • Changing fluid filters regularly
  • Investigating hydraulic fluid for color, odor, or contamination.
  • Listening for loud knocking caused by cavitation in the pump.
  • Checking hydraulic fluid levels and adding hydraulic fluid of the same brand and viscosity grade.
  • Inspecting breather caps, filters, and fill screens.
  • Examining return/pressure/hydraulic filter indicators and pressure gauges.
  • Performing regular bleeding-off of air to prevent air contamination.

Common Hydraulic Lift Issues: What to Check for

If you follow preventative maintenance best practices, you probably won’t have any significant issues. However, if your hydraulic lift experiences problems, it may stem from a lack of comprehensive maintenance. These are the most common causes of hydraulic lift problems:

High Temperature

Most hydraulic equipment has hydraulic fluid that runs between 110-150 degrees, although some mobile systems run much higher.

While the hydraulic fluid is supposed to get hot when it runs through the pumps, tubing, and relief valves, if the temperature becomes too high, it can damage most seal compounds and accelerate the degradation of the oil. To prevent the hydraulic fluid from overheating, you must regularly check the oil cooler and outside the reservoir.

In addition, the high temperature can be caused by anything that increases its heat load or reduces the lift’s ability to dissipate the heat. So, it’s essential to monitor and maintain the reservoir fluid level. Also, removing any build-up of debris or dirt around the reservoir is crucial.

Lastly, any internal leak can increase the head load on the hydraulic equipment, so it’s vital to check the cylinder to see if it’s leaking past its seal or if a relief valve isn’t adjusted correctly. Once you determine the issue, you’ll need to replace any heat-generating auto lift components.

To prevent damage to your seals and increase the hydraulic fluid’s life, installing a fluid temperature alarm is a good idea.

Hydraulic Equipment Not Priming

Self-priming pumps prime themselves by drawing fluid from the tank below. While they usually function just fine, sometimes there’s a failure to prime. The most common causes of your hydraulic equipment failing to self-prime are:

  • Air leak
  • Debris in the impeller
  • Pump is airbound
  • Plugged recirculation port
  • The lift is too high for the pump speed

If there’s an air leak in the suction line, the air will be drawn into the pump instead of releasing enough to create a low-pressure area.

Also, if the impeller’s eye is full of dirt and debris, the impeller can’t create an area of low pressure.

If the pump is airbound, it could mean that there is no air release line, the discharge line is pressurized, or excessive clearance exists between the wear plate and the impeller.

When the priming process works correctly, fluid is recirculated through the casing. However, if the port is clogged with debris, the impeller’s eye can’t create the low pressure needed to pull liquid up the suction line.

Lastly, ensure you have the correct size pump for the suction line, as if you’ve underestimated the pump size, it won’t be able to prime. This failure to prime is caused by the inability to create the low-pressure area it needs.

Knocking Sound When Operating the Lift

When you hear a knocking sound while operating your auto lift, it’s most likely due to air contamination. An unsuitable air balance can lead to air contamination in the hydraulic fluid. In addition, fluid vapors can implode due to the force exerted on them, also called cavitation. This implosion of air bubble vapors causes a knocking sound.

If you have air contamination, you can open the valve and bleed the air until you see the liquid coming out. However, to prevent this from happening again, it is recommended to perform regular bleeding-off of air in the hydraulic car lift. Bleeding off air opens the air valves and releases enough air until there is even circulation in the pump.

The Auto Lift Won’t Go Up or Down

Unfortunately, despite your best maintenance efforts, sometimes mechanical issues happen. Although mechanical damage is expected, you can often fix it by replacing one or more auto lift parts.

The best way to prevent mechanical issues like your lift stalling (or not moving at all) is to check all movable parts on a routine basis. Ensure the appropriate components are greased, and any worn-out parts are replaced. Preventative maintenance of your hydraulic auto lift should keep your shop running smoothly!

Hydraulic Replacement Parts from SVI

A successful auto repair shop requires automotive knowledge, the proper equipment, and an excellent preventative maintenance plan. As a dedicated mechanic, you know the importance of having a reliable and trustworthy automotive equipment parts partner. With over forty years of auto equipment experience, we have what it takes to keep your hydraulic equipment up and running. So, let SVI be your partner if you need new hydraulic equipment or a replacement part. Request a quote from us today!

Mechanic Shop Cleaning Checklist: Complete Guide

Mechanic Shop Cleaning Checklist:

Having a clean and organized mechanic shop is essential to your customers and also vital to employee success. For example, if a customer enters a dirty waiting area or sees tools and equipment lying on the floor of the automotive bays, they may decide to take their business elsewhere.

Additionally, a technician working in a disorganized and dirty bay may be unable to find the right tool they need, causing the employee to take longer on the job. Or spilled beverages and automotive fluids can cause safety issues for the technicians, including slips and falls.

However, with a clean and organized environment, customers can trust the shop’s technicians and overall business. Also, the employees are more likely to have higher productivity and higher quality work.

So, now that you know the importance of a clean shop, let’s review the mechanic shop cleaning checklist:

Purchase Proper Cleaning Tools

You must first obtain the proper cleaning tools to have a clean shop. Many shops use chemical dispensing units for their ease of use, efficiency, and safety. These dispensing units provide quick access to properly mixed chemicals, ensuring that your technicians aren’t exposing themselves to more chemicals than necessary.

Use Mats

Mats are one of the easiest ways to keep your shop clean, safe, and productive. For example, shop mats can capture automotive fluids, so they don’t spread to the waiting area. In addition, placing mats at the entry points prevents the spread of dirt, grime, and debris.

Place mats at all entrances to prevent the spread of debris throughout the shop. Putting them in high-activity areas is also essential to reduce worker injury and catch any automotive spills. To keep the mats functional and effective, it’s a good idea to partner with a mat laundering service.

Stock Supplies for Potential Spills

Mats will help your auto shop maintain cleanliness, but it’s also essential to stock oil containment products nearby for any potential spills. A quick response to spills is necessary and having easy access to cleaning supplies is a must!

Designate a Home for Tools and Equipment

It’s integral for technicians to have a designated space to put tools when they are finished using them. When your shop has a home for each instrument, your technicians can quickly find the necessary tools, and the shop looks organized. Likewise, when you order new automotive repair parts or supplies, make sure that there is a designated place for them to go.

Use Approved Storage for Hazardous Materials

One often overlooked area in a mechanic’s shop is hazardous materials. This area will stay clean and safe if you use approved storage containers with securely closed lids and a proper fit. If you don’t have the correct containers, it’s necessary to purchase them as soon as possible.

Set up a Floor Cleaning Protocol

Not only is a clean floor safe for employees, but also for customers. While sweeping and mopping are essential, you must also use heavy-duty scrubbers to wash oils and fluids away. Ensure that you’re using the right chemicals and mops for proper cleaning.

Clean and Disinfect the Waiting Area

A clean and comfortable environment is the most critical element for your customers, so it’s essential to ensure it’s in top condition every day. Design a cleaning schedule for disinfecting the floors, chairs, and tables so your customers can be comfortable while waiting.

Sanitize and Clean Restrooms

Both customers and employees need a clean bathroom, including plenty of soap, toilet paper, and paper towels. It’s a good idea to have extra supplies on hand, so you don’t run out unexpectedly. Also, set up a daily reminder to sanitize and disinfect all surfaces.

Air fresheners are essential in public restrooms, and time-release systems are even better. They will reduce any unpleasant odors and keep your bathrooms smelling fresh.

Schedule Deep Cleanings

Daily cleaning is essential but doesn’t remove all automotive fluid build-up from the floor and other spaces. Power steering fluids, antifreeze, and lubricants can make the shop floor an unsafe environment for employees and customers, but it’s also unsightly.

If your shop doesn’t have the resources to deep clean all of the shop’s surfaces, there are plenty of service providers that specialize in automotive facility cleaning.

Declutter the Shop

If you have equipment, parts, or supplies in your shop that are broken or obsolete, it’s time to purchase the necessary repair parts or get rid of them. Not only do they take up extra space, but they add to a disorganized workplace.

Improve Employee Appearance

While employee appearance doesn’t dictate how qualified a technician may be, customers may be more willing to do business with clean, uniformed technicians. In addition, uniforms that show the shop’s name and employee name create a great first impression for the customers.

Plenty of rental services will launder and return freshly cleaned uniforms for the employees.

Promote Clean Hands

Technicians will inevitably have grease and oil on their hands after working on cars, so you must provide proper handwashing stations. Standard soap isn’t sufficient to remove oil and grease, so make sure you supply heavy-duty soaps and substantial paper towels.

Additionally, if your technicians perform more heavy-duty services, you must provide heavy-duty protective gloves. Gloves protect their dirty hands from spreading grease and grime to other tools and equipment.

Provide Clean Shop Towels

Few things are more important in an auto shop than an abundant supply of clean shop towels. It’s a fantastic idea to partner with a laundry service so your technicians can always access fresh towels.

When you own a mechanic’s shop, there are many things to consider beyond having solid automotive knowledge. Not only do you have to possess management skills, but you also need to be an excellent communicator to speak to customers. Many soon-to-be shop owners don’t think about keeping the shop clean, but it’s just as crucial to the shop’s success as possessing automotive knowledge.

When you open a new shop, partnering with trustworthy institutions like a uniform rental company, an automotive shop cleaning company, and a reputable automotive repair parts supplier is essential. So let SVI International be your trusted automotive repair parts partner, whether you need air compressor components, spray equipment products, or tire changer parts. SVI is here to help your shop be as successful as it can be!