Automotive Service Equipment Your New Repair Shop Needs

automotive service equipment

You will not be able to run a successful auto repair shop without the right equipment. Without it, nothing separates you from a person with a home garage and a toolbox. Investing in some large equipment will elevate the level of service you can provide. Ideally, you would like to get started purchasing all your equipment before you open your shop. This way you can spend the time to find the best quality products, and the best sales.

When you wait to buy something until the moment you need it, you may deal with out-of-stock products or miss out on sale prices by rushing to make an impulsive purchase. This could even potentially push back the timeline of a repair, which won’t help the reputation of your shop. If you want to feel best prepared, here is a list of automotive service equipment every new shop needs.

Vehicle Lift

The heart of your shop, this will be front and center of any automotive repair space and thus will be used frequently. This is a purchase you will need to put some thought into before pulling the trigger since your safety is at risk if you go with a cheaper lift model. There are also many types of lifts to consider, from symmetrical and asymmetrical, to 2 post or scissor lifts. Figure out what kind of lift will best compliment your area of work, but as always, take notice of the quality you’re purchasing.

Air Compressor

You won’t get very far without an air compressor since it’s required for the operation of many other tools. You should look for the largest capacity compressor within your budget and power limitations. This will likely be your first purchase, so make sure it’s quality!

Jacks

Jacks come in all different sizes and are equipped with different capacity features. You know your repair work will require you to lift vehicles often, so investing in a high-capacity jack for your shop is essential. Since you are heavily relying on the safety of your floor jacks and pole jacks to avoid injury, never overlook the importance of getting top-quality.
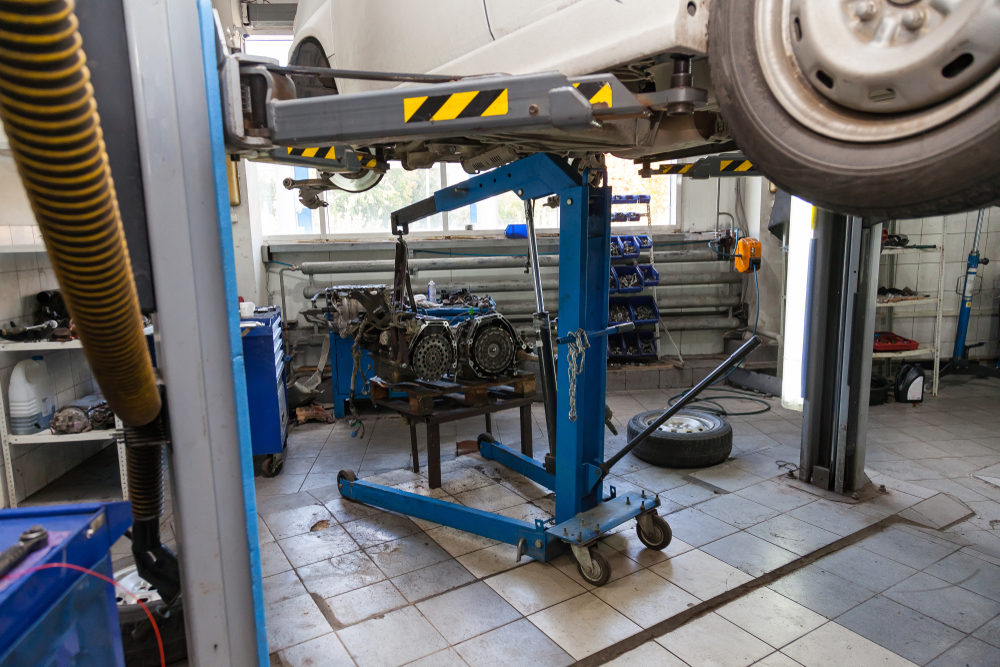
Transmission Jack

While it’s important to have basic floor jacks, at times something more robust is necessary. If you plan on offering services where you will need to support large transmissions, consider purchasing a transmission jack. You should be able to find several additional uses for a transmission jack, as having it around will come in handy anytime you need to hoist something heavy.

Brake Lathe

While brake work can be done without one, having a brake lathe in your arsenal will allow you to perform brake repairs way more efficiently. Commonly used to fix noise issues, brake lathes help extend the life of brakes and therefore earn a valuable place in any repair shop. You may purchase an on-car or off-car brake lathe, which simply differs in how the lathe is mounted. Either one will accomplish the same goal.

Hydraulic Press

If you’re in need of crushing or bending metal material, look into the expensive, but useful hydraulic press. With this, you can separate rusted parts and straighten bent metal, which can really speed up certain repairs.

Engine Hoist

This will come in handy if you plan on doing work on engines that requires you to take them apart. Know the weight of the engines you will be servicing, as you will need a hoist that fully supports the weight. You will really appreciate this when it comes to installing engines in tight compartments.

Workbench

This may be something you didn’t think about, but most of your work will be done on a workbench. Make sure you have one durable enough to withstand strong impacts. Expect steel benches to last much longer than wooden ones.

Where to Get Your Equipment

Overall, you will need more than just the equipment mentioned above, but it serves as a good place to start since it covers most of the larger purchases. Start purchasing vital equipment as you can afford it and put them aside for when you’re ready to open your shop. You could keep an eye out for quality used equipment to save some money, just ensure all safety features are up to standard, and it wouldn’t be a bad idea to make sure the instructions are included.

As mentioned above though, it would be best to keep an eye open for quality equipment and tools. Partner with a reliable distributor to get you the parts you need when you need them.

SVI International: Connecting You with High Quality Automotive Equipment

If ever in doubt about what kind of lift or lift parts you need to complete a maintenance repair on your vehicles, SVI International is always here to help. As a leader in repair parts for automotive lifts, you can always expect a prompt delivery from one of our three warehouses across the United States. Reach out to us at (800) 321-8173 or complete our online contact form. Browse our selection of products and reach out if you are in need of something custom for your space!

Car Lift Hydraulic Cylinder Repair: Complete Guide

The hydraulic cylinder on your auto lift is arguably your hardest working component. As such, the cylinder will not be able to perform at its best if not kept clean and free from damage. Doing regular maintenance and examinations is the best way to save your money for repairs or replacement and by reducing downtime and eliminating interruptions to your work from malfunctions. However, after a certain amount of time, you may notice signs of deterioration or improper function where repairs are now inevitable. Find out how to identify common reasons for hydraulic cylinder failure and tips on how to proceed with repair.

Common Indicators of Repair

Leaking Cylinder

You might have heard the term cylinder bypass to refer to a leaking hydraulic cylinder. A leaking cylinder is an easily identifiable problem, but there could be several causes. Likely, the piston seals are worn, and their effectiveness have decreased greatly. Leaking can also result from damage to any of the internal parts, particularly the barrel or piston. Things like loose bearings, neighboring broken hydraulic components getting into the cylinder, or parts plagued with dirt and debris will also fail to prevent leaking.

Damaged Piston Rod

Any cracks, dents, rust, scratches, or other damage to your piston rod need to be addressed, otherwise your cylinder might suddenly fail. If the piston rod suffers significant damage, it creates more work for the hydraulic cylinder, eventually causing it to buckle or break. Make sure you test the piston rod to ensure it is strong enough and check if it is properly aligned within the cylinder. These precautionary actions are worth looking over to stop your cylinder from being overworked and repairs from becoming costlier.

Cylinder Mountings Are Not Secure

If mountings on the cylinder are not secure, pressure from your hydraulic system can escape. Fixed mountings should keep bolts in place and therefore should not move. On the other hand, pivot mountings need enough lubrication to operate correctly, and if too worn, they will become misaligned and in need of replacement.

While these issues are a main cause for repair, not every problem can be easily identified. Having a skilled technician with the right knowledge inspect your hydraulic cylinder often serves as the best way to discover the root cause. Get a professional involved so you can perform the correct repair or identify when full replacement might be the best choice. Even though a full replacement may sound like the most expensive option, making a series of incorrect repairs that do not resolve the underlying problem will end up adding up quickly.

Tips on How to Repair a Hydraulic Cylinder

Cylinder repair conditions change depending on the type of cylinder, and what type of repair is needed.  In a pinch, doing a repair on your own can save money, but here are some important things you will need to know.

  • Great preparation will set you up for success. If tackling a repair on your own, you will need a large enough workspace, the right tools, cleaning products, and safety precautions. Large cylinders often have some bounce back that can catch an amateur off guard if not prepared. If you feel unequipped to handle the repair safely, consider getting help from an experienced technician.
  • Your screwdriver can be your enemy. Lots of care is needed when working with hydraulic cylinders. You may be able to complete the task, but all it takes is a simple scratch from a screwdriver to erase all the work you just did. Since hydraulic cylinders cannot be damaged at risk of creating a new problem, a workspace where you have enough room to keep components separate and clean is absolutely essential.
  • Repeated repairs mean there is a bigger problem. Having a professional on hand will ensure the root of the problem is discovered with a thorough inspection. If you are removing a cylinder to make a repair, do not waste the opportunity to check for damage or other imperfections.
  • Check for proper seal size the right way. Before you order a new seal, you need to order the correct size. You can do this by measuring your current seal, but the size can be impacted from constant machine operation or poor installation. Measuring the grooves where the seals sit will provide a more accurate result. For more about seal replacement, you can consult this guide.

Repairing a hydraulic cylinder is literally a messy job, sometimes to save time or to keep your hands clean, it is best to leave the work in the hands of a professional. If uncertain of how to move forward, getting a skilled technician involved could shed some light on the bigger issue.

SVI International: Connecting You with High Quality Automotive Equipment

If ever in doubt about what parts you need to complete a maintenance repair or replacement of your hydraulic cylinder, SVI International is always here to help. As a leader in repair parts for automotive lifts, you can always expect a prompt delivery from one of our three warehouses across the United States. Reach out to us at (800) 321-8173 or complete ouronline contact form. Ask us about specialty hydraulic cylinders if customized needs are required for your job.

Choosing the Right Rotary Lift Fluid & Hydraulic Oil

When it comes to maintaining your shop’s rotary lift, one detail often overlooked (but absolutely critical) is the type of hydraulic fluid you use. Selecting the proper rotary lift fluid type ensures smooth operation, prolongs equipment life, and keeps your work environment safe. At SVI International, we understand how vital it is to get the small details right, especially when those details affect lift safety and performance. In this blog, we’ll guide you through everything you need to know about rotary lift oil types, helping you make informed choices that protect your investment.

How the Right Hydraulic Fluid Protects Your Rotary Lift

Hydraulic fluid acts as a lubricant, coolant, and protectant for the internal workings of your lift’s hydraulic system. When the wrong fluid is used, something too thick, too thin, or chemically incompatible, the entire system suffers.

Lifts begin to operate sluggishly. Valves and cylinders wear prematurely. Seals can swell or shrink, causing leaks. And in the worst cases, you may face complete system failure. Using the correct rotary lift oil type extends equipment life, reduces downtime, and protects the safety of technicians.

Understanding Rotary Lift Hydraulic Systems and Fluid Requirements

Hydraulic lifts, like those made by Rotary, operate using pressurized fluid to raise and lower vehicles. Each system is designed to function within certain fluid specifications for optimal performance. Whether you’re using a surface-mounted two-post lift or an in-ground scissor lift, the fluid you choose must meet the operational demands of your specific model.

Key Parts That Depend on the Right Hydraulic Fluid

  • Cylinders: The lifeblood of any hydraulic lift, cylinders push and retract using fluid pressure. Using a fluid with the wrong viscosity causes jerky movement or slow response.
  • Pump Motors: These depend on the fluid’s lubricity to function efficiently. Without the right oil type, wear increases and performance drops.
  • Valves and Hoses: Hydraulic control valves and hoses are designed for specific fluid types. The wrong fluid can cause internal deposits, leaks, or ruptures.
  • Seals and Gaskets: These are especially sensitive. Some fluids swell seals; others shrink or harden them, all of which can result in fluid loss and lift malfunction.

Using the correct rotary lift hydraulic oil is one of the best preventive steps you can take to avoid long-term damage.

What Type of Hydraulic Fluid Should You Use in a Rotary Lift?

Most rotary lifts operate best using ISO 32 or ISO 46 hydraulic oil, depending on the specific lift model and operating environment. These fluids offer an ideal balance of lubricity, viscosity, and temperature performance, ensuring smooth and reliable lift operation.

While you should always consult your lift manufacturer’s specifications, here’s a general guide:

  • ISO 32: Best for colder climates or indoor shops where fluid needs to flow easily at lower temperatures.
  • ISO 46: Better suited to warmer environments where higher operating temperatures are common.

In many cases, a high-quality AW 32 hydraulic oil is recommended, especially for shops where cold starts are a concern.

Important Note:

Avoid mixing oil types or substituting with fluids like automatic transmission fluid (ATF). While ATF may appear similar, it typically lacks the proper additive package required for safe, consistent hydraulic lift performance. It’s always best to check your lift’s manual for exact fluid specs. Or, better yet, consult with a lift expert like SVI.

How to Choose the Best Hydraulic Oil for Your Rotary Lift

Choosing the right oil isn’t just about matching a number on a spec sheet. You need to consider how and where your lift operates, the temperatures it encounters, and even the brand quality of the fluid you’re buying.

Factors to Consider: Viscosity, Temperature, and Additives

  • Viscosity: This refers to the fluid’s thickness. For most shop environments, ISO 32 (or SAE 10W equivalent) is ideal. If your shop is in a colder climate, you may need a thinner oil to ensure proper flow during startup.
  • Temperature range: If your lift operates in a non-climate-controlled area, temperature becomes a key factor. Choose a fluid with a wide operating temperature range that won’t thicken in the cold or degrade in the heat.
  • Additives: Look for fluids with anti-wear, anti-foam, and rust inhibitors. Avoid fluids with detergents or friction modifiers, which can damage seals and reduce efficiency.

When and How to Replace Hydraulic Oil in Your Rotary Lift

Like any mechanical system, your lift’s hydraulic fluid will degrade over time. Heat, moisture, and contamination all take a toll on fluid quality. Most manufacturers recommend a complete fluid change every 12 to 24 months, depending on usage.

Signs it’s time for a fluid change:

  • Slower lifting or lowering speed
  • Dark, cloudy, or milky fluid
  • Unusual noises during lift operation
  • Visible debris or water in the reservoir

Steps for replacement:

  1. Lower the lift completely and turn off power.
  2. Drain the existing fluid into an approved container.
  3. Clean or replace the hydraulic filter if your system uses one.
  4. Refill using the correct rotary lift fluid type to the recommended level.
  5. Cycle the lift several times to purge air from the system.

Always dispose of old fluid responsibly, following local regulations.

Keeping Your Rotary Lift Running Strong: Parts, Service, and Support

Hydraulic fluid is one piece of a much bigger picture. Regular service, inspections, and quality parts all contribute to safer, more reliable lift operation.

SVI International provides everything needed to keep your rotary lift performing at its best. From replacement cylinders to hydraulic hoses, seal kits, power units, and even full lift assemblies, we’ve got you covered.

Not sure what part you need? Our team is ready to help. Need a custom hydraulic solution or specialty lift? We build those too.

Need help finding the right rotary lift oil type or parts for your setup? Contact SVI International today

Complete Guide on Using a Tire Machine  

A tire machine is a must for any commercial garage or tire shop. The tire machine saves time, provides a safe way to change a tire, and ensures that tires are repaired and mounted properly.

A tire changer is used to complete the entire process of changing a tire. When you know how to use a tire machine, It helps in the dismounting, deflating, changing and mounting of the tire.

Different Types of Tire Changers

There are many different types of tire changers available. Until the 1990s, tire changers used a center post mounting system. The tire and wheel assembly were lifted onto a threaded center post.

Today, there are different approaches to tire changers. They typically use one of two different operating systems.

Hydraulically operated changers use hydraulic fluid and compressed air to press on the tire, releasing it from the wheel. Manually operated tires require a technician to press down on a lever and at times move it to break the bead.

Here’s a look at five common tire changers.

Swing Arm

In commercial tire shops, the swing arm tire changer is the most common. It comes with four adjustable jaws on a tabletop that give a wide range of clamping capability. Each of the jaws can be adjusted simultaneously for more precise clamping.

Jaw covers provide enough mounting torque to protect the wheels during the changing process. These changers are easy to use and affordable but do require unscrewing of the machine head to deal with different tire types.

Tilt Back

This style typically has an internal clamping capacity of 30 degrees and an external capacity of 28 degrees, making them easier to use on larger tires.

Leverless or Touchless

These are another common type used in tire shops. They are typically more expensive than swing arms and tilt backs but well worth it.

There’s very little training necessary and staff can get up to speed quickly. They are also very efficient at removing and mounting tires. For tire rotations or switching tires among wheels, there’s no bead damage, too.

One of the most popular features is the changer’s ability to handle heavy rims, lifting, and setting them down with ease. There’s no need for manual heavy lifting, a popular feature in busy shops.

Heavy Duty

For larger vehicles used in agriculture, construction and mining, this changer type is common. They can accommodate wheels up to 56 inches in diameter and tires up to 90.5 inches in diameter. Newer versions can handle tires up to 95 inches using hydraulic systems and a self-centering four-jaw chuck.

Motorcycle

Specially made to handle motorcycle tires, this changer is simpler and can handle much smaller tires and wheels.

Before deciding to purchase a tire machine, it’s important to know about the different kinds of tire changes and how to use a tire machine.

Steps to Using a Tire Machine

a mechanic removing a tire from the warehouse wall

No matter what type of tire machine is being used, the basic steps for changing a tire are the same. Understanding the steps and instructions for your tire changer is critical to ensure the machine is used properly and safely.

Safety

Safety is the most important task when it comes to a tire changer. Learn about the machine itself, first, knowing about the various components and how they operate. For example, see what kind of foot pedals there are and how many.

Always use safety glasses when operating a tire changer. And avoid clothing that could get caught in the machine. Gloves may be helpful in operating some, but not all, changer types.

Other key safety considerations are to ensure that the tire is the right size and construction for the machine you’re using and do not exceed the manufacturer’s recommended pressure level when inflating.

Deflating the Tire

Start by removing the valve stem cap and remove the valve core. Then deflate the tire completely. If the tire is just going to be patched and not balanced, mark locations on the valve stem and wheel weights. If another tire is going to be installed, be sure to remove wheel weights from the wheel before installing the new tire.

Place Rim on Tire Changer

You next need to place the wheel on the tire changer. Be sure the tire is facing in the right direction. You’ll next need to unseal the tire beads from the bead seats. A foot pedal is used with a bead breaker arm, which should only be in contact with the tire, not the rim. The wheel is then turned around to break the bead on the other side.

Clamp the Wheel

You’ll next want to clamp the wheel using either inside or outside clamps. Inside clamping uses the rim with jaws that expand outward and lock the wheel in place. Outside clamping is used to avoid damaging the rim and clamps the outside flange on the outside of the rim.

Remove Tire from Wheel

Once the wheel is clamped in, it’s time to take the tire off. You lower the duckhead onto the flange and ensure the bead breaker is well inserted. Then you begin to activate the turntable. The top bead will be pulled over the outside of the rim, followed by the bottom bead.

Inspect the Tire & Wheel

You’ll want to inspect the inside of the tire if not replacing it, looking for cuts, objects or loose cords. Also inspect the rim to see if there are any cracks, dents, sharp edges, or other damage.

Valve Stem Replacement

Remove the old valve stem with a puller or knife and install a new stem. Thread the new stem and lubricate it before ensuring it’s properly sealed.

Mounting

Whether remounting the old tire or mounting a new one, make sure the right side is facing out. Add lots of tire lubricant to the circumference of both beads.

Twist the tire so the bottom bead is at an angle before activating the turntable. Do the same for the top bead.

Inflating a New Tire

Inflate the tire to the proper pressure using the manufacturer’s guidelines. Be sure to unclamp the wheel once the beads are sealed and before doing the inflating.

Replacement Parts for Tire Machines

With the amount of wear and tear on a tire machine, it’s inevitable that there will be a need to repair or replace worn-out parts. At SVI International, Inc., we’re the leader in equipment parts for garages and tire shops. Shop by make or model to find the parts you need and get them delivered fast.

We offer parts by all the leading manufacturers, including All Tool, AMMCO, FMC, Hofmann, Hunter, John Bean, Snap-On, and Tuxedo.

To learn more about our complete line of tire machine replacement parts, including plastic protection inserts and covers and cylinder seal kits, visit us today.

mechanic showing how to use a tire machine